Caution: Caveman Cooking

Recipes so easy, even a … Well, you know!

Archive for December, 2015

Cavey’s Colossal Shrimp Cocktail

Posted by Caveman Cooking on December 30, 2015

Cavey’s Colossal Shrimp Cocktail
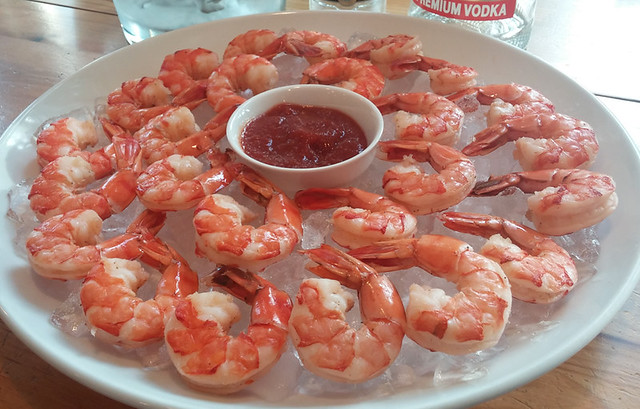
With the New Year’s Eve celebrations set for tomorrow, I thought I’d share one of the favorite appetizers we will enjoy in the Cavehold as we ring in 2016. In fact, we bring this one out just about anytime we are celebrating anything. Take a bite of one of these plump, succulent, delicious decapod crustaceans and you’ll be adding this shrimp cocktail recipe to your next fete’s menu, too! Best of all, the recipe is SO easy … just the way I like ’em!!

INGREDIENTS

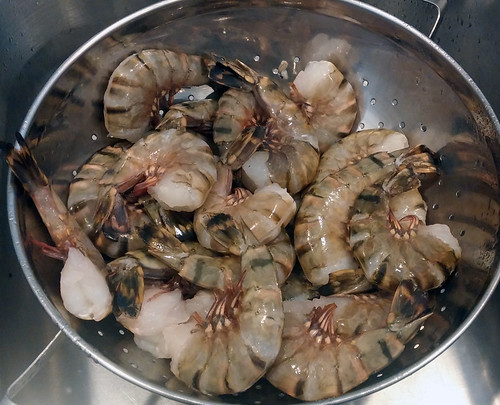
2 Pounds Of Jumbo Black Tiger Prawns – shell on, deveined
4 Quarts Cold Water
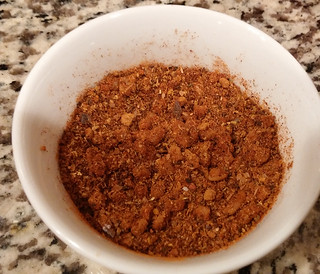
2 Tablespoons World Spice Merchants “Classic Crab”
1 Tablespoon Whole Black Peppercorns
1 Preparation of Cave’s Quick Cocktail Sauce
OPTIONAL: Replace 1 cup of the water with a can of your favorite beer

RECIPE

Place shrimp in large colander and quickly rinse with cool water and drain. If frozen, DO NOT defrost.
NOTE: I prefer the “U-12” Black Tiger Shrimp found at Costco. They are already deveined, yet still have the shells on … plus, they are so tasty! That said, any uncooked colossal shrimp (12-14 per pound) should work just fine.
Uncooked Tiger Shrimp

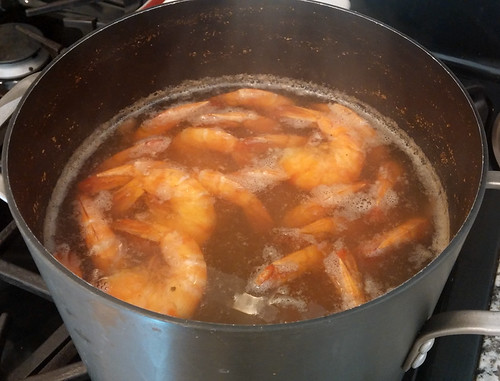
Fill large stock pot with water (add beer, if so inclined), World Spice Merchants “Classic Crab” spice blend, and peppercorns. Bring to a boil, then let simmer for 10 minutes. Return to boil and add shrimp. Reduce flame and cook until prawns are pink and opaque throughout (about 5-8 minutes if frozen, 3-5 minutes if not) – shrimp will usually float when done.
NOTE: You can substitute the World Spice Merchants Classic Crab with Old Bay Seasoning or other seafood-boil spices. Though, I would recommend adding a Bay Leaf, mustard seed, and other spices/herbs to make up for the difference in flavor.
Cooking Shrimp

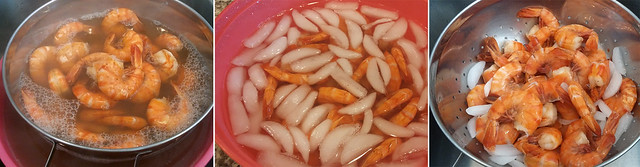
When done, immediately strain shrimp in a large colander. Then quickly place prawns into an ice bath until fully cooled. Again, quickly strain shrimp well.
NOTE: It is important not to let the shrimp sit in the cooling water too long. They can absorb water like a sponge, ruining their taste and texture.
HINT: We like to reserve the cooking broth as it makes a great base for seafood soups, cioppino, etc. Just let it cool, put it into a container, and freeze it until ready for use.
Strain, Cool, and Strain Shrimp

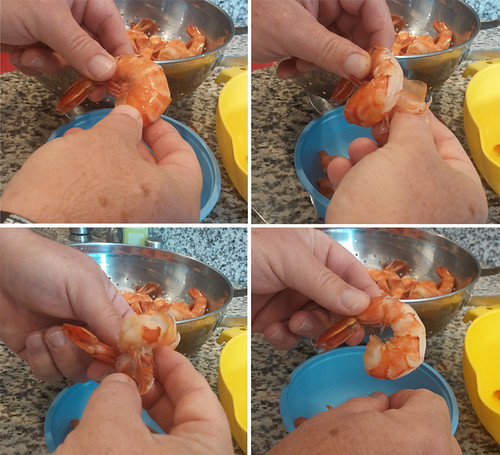
Next, shell the shrimp. If you do it right, you can take off the the shells and remove the legs in one motion, as displayed below. I also like to leave the tail and last section of shell on. Not only does it give the dish a stylish presentation, but acts as a little handle for you and your guests to use when eating it.
Peeling Shrimp Cocktail

You can either serve them immediately or refrigerate them for up to 3 days. When ready, just plate them on a large ice-filled platter with a small ramekin of Cave’s Quick Cocktail Sauce in the center. Have another empty ramekin nearby for the discarded tails. Now just dip and enjoy! And, most importantly, have a happy, healthy, and happening New Year!
Cavey’s Colossal Shrimp Cocktail

Prep Time = 20 minutes
Cooking Time = 2-6 minutes
Serves 6-12

©2015 Caution: Caveman Cooking/UHearMe, Inc. All rights reserved. This recipe originally appeared on the Caution: Caveman Cooking blog at http://cavemancooking.net authored by Caveman. This recipe may be shared and reprinted as long as this entire copyright message accompanies it.

Posted in Appetizers, Holidays, New Year's, Seafood | Tagged: , , , , , , , , , , , , , | Leave a Comment »

A New Year’s Wish

Posted by Caveman Cooking on December 29, 2015

From our Cave Clan to you and yours, a wish for a healthy, happy, and happening 2016!

Fondly,
The Avery Family

Posted in Holidays | Tagged: , , , , , , , | Leave a Comment »

Killer Chili Rojo (Red Pork) Tamales

Posted by Caveman Cooking on December 4, 2015

Killer Chili Rojo (Red Pork) Tamales
I gave you my Killer Queso (Cheese) Tamale recipe a few months back. Though, I probably should have posted it’s carnivore counterpart sooner, I felt, with Christmas right around the corner, now would be a perfect time to share it. While this remains a labor intensive recipe, it really is a very easy dish to pull off. Besides, if you gather your masses together for an assembly line when it comes time to actually fill and roll the tamales, it goes by very quickly. When you finally unwrap one and take a bite, you’ll forget about all the steps involved!

INGREDIENTS

Chili Rojo (Meat Filling):
1 Preparation of Chili Rojo Rub
2.5 Pounds Pork Butt (Shoulder) Roast
1/2 Red Onion
5 Cloves Garlic – Smashed
1 Teaspoon Kosher or Sea Salt
1 1/2 Cups Red Chili Sauce
1 1/2 Cup Chili Rojo Stock – Reserved

Masa (Dough):
5 Cups Tamal (Instant Masa Mix)
4 1/2 Cups Vegetable Stock
1/2 Cup Chili Rojo Stock – Reserved
2 1/2 Teaspoons Baking Powder
1.5 Teaspoon Salt
2 1/8 Cups Vegetable Shortening
1 1/4 Teaspoon Cayenne Pepper

1 Package Hoja (Dried Corn Husks)

RECIPE

Follow the instructions for one preparation of Chili Rojo Rub.
Chili Rojo Rub

Cover pork butt roast liberally with the rub. Cover tightly with plastic wrap, place on a plate, and refrigerate overnight.
Pork Butt Roast Covered With Chili Rojo Rub

The next day, remove the roast from the refrigerator 15-20 minutes before you are ready to start cooking. Slice onion into quarters. Peel and smash garlic cloves.
Quartered Onion & Smashed Garlic

Place pork roast into a stock pot. Cover with water by 2-3 inches. Add onion, garlic, and salt. Bring to a boil. Then, reduce heat, cover, and simmer for 2.5 – 3 hours, until fall-apart tender.
Pork Roast In Stock Pot

When done, remove the pork roast from the stock pot and place onto a large platter. Let it rest for 10-15 minutes, then shred meat with two forks or, if you have them, meat claws. Be sure to separate the meat from the fat, and discard the latter.
Shredded Chili Rojo

Reserve 2 cups of the meat stock (1 1/2 for the meat, 1/2 for the masa) and set aside.
Reserving Meat Stock

Place the shredded meat into a large sauce pot, add Red Chili Sauce and reserved meat stock, and heat uncovered over a low flame for 20 minutes. Stir often.
NOTE: You’ll likely have some left over meat filling. Don’t sweat it, it makes for a great version of Carnitas!
Saucing & Reheating Meat Filling

Cover the Hoja (corn husks) with cool water for at least 40 minutes. When thoroughly soaked, squeeze excess water out then place into a colander to allow rest of excess water to drip out. Do not let the husks dry completely – they must be moist and pliable when wrapping the tamales.
HINT: Place a heavy plate on top of the husks so that they stay completely submerged.
Soaking The Hoja (Corn Husks)

While the meat filling is simmering and the Hojas soaking, make your Masa (dough). Place shortening into mixer and whip it until silky (3-4 minutes). Yes, Devo fans. I said, whip it. Whip it good!
Whipped Shortening

Meanwhile, place all the dry ingredients (Tamal, baking powder, salt, cayenne pepper) into a large mixing bowl and whisk together.
Dry Ingredients

Add vegetable stock and meat stock to dry ingredients. Using your hands, mix well until evenly distributed.
Dry Ingredients With Vegetable Stock

Add ingredients from mixing bowl to whipped shortening. Again, whip it until smooth and creamy (3-4 minutes). And yes, again, whip it good!
Whipped Masa (Dough)

Now’s the time to gather the clan and press them into service. Pop open a cold one, put on some good tunes, and make a party of it!
Place one of the large Hoja (husks) on a flat surface and spoon about 2 tablespoons of the masa (dough) onto it. Now, this is where some tamale veterans may cringe, but I have found that this next step makes things go much faster and smoother. Take a small piece of plastic wrap and place it over the masa. With your hand, smooth and spread the masa out evenly, leaving several inches from the bottom of the husk, a couple inches from the top and far edge, and less than an inch from the near edge. The masa layer should be about 1/4″ thick. Remove the plastic wrap and set aside to use again. Then, scoop about 2 tablespoons of the Chili Rojo (meat filling) into the center of the masa.
HINT: If your Hoja are on the smaller side, just overlap two of them by a few inches to make one big leaf. Use a rubber spatula to spread a little masa on the near edge of the bottom husk to act as “glue”.
Making Tamales: Steps 1, 2, and 3

This is where a history of being a Hippie or Rastafarian, comes in handy. Take the near side of the Hoja and fold it over the the far edge. With your fingertips, lightly press the edges of the masa down to seal in the meat. Then, while holding down the far edge of the husk, push down and draw back the near edge of the husk an inch or two so that the masa forms a sealed tube, of sorts. Now, fold up the bottom (narrow) end of the Hoja, making sure it is snug up to the bottom of the filling. Finally, roll the entire thing away from you, over the remaining flap, and …
Making Tamales: Steps 4, 5, and 6

… KaBOOOOOOOM! You have a tamale!! Most folks say tying up the open end of your tamale is optional. But, tying them up with a strip of Hoja keeps all the ingredients inside, and also helps make them look better when done.
Finished Tamales

Once you have formed all of your tamales, fill the bottom of a large steamer pot with water, place the steam insert into the bottom, and cover it with several Hoja leaves. Stack the finished tamales standing up in the steamer. Bring the water to a boil and cover the steamer, allowing the tamales to steam for about 60 minutes.
HINT: You’ll notice that the one tamale I didn’t tie up leaked out the top. Which is why I strongly urge you to give them the “50 Shades Of Grey” treatment.
Steamer, Raw Tamales, and Steamed Tamales

When you think they are done, remove one to test. When it has cooled sufficiently, unwrap it and enjoy. If it has steamed sufficiently, remove the rest from the steamer. Serve with avocado, guacamole, pico de gallo, salsa, rice and beans … you name it! These also freeze very well for future use. Just re-steam them or nuke ’em in the microwave, once they have defrosted.
Killer Queso (Cheese) Tamales

Give these a try … you won’t be disappointed. I’ve had several Hispanic friends swear me to secrecy that they actually liked these better than their Mom’s. Don’t worry, amigos … I’m not naming names! 😉

Marinate Time = 24 Hours
Prep Time = 90 minutes
Cooking Time = 4 Hours
Makes 28-32 Tamales

©2015 Caution: Caveman Cooking/UHearMe, Inc. All rights reserved. This recipe originally appeared on the Caution: Caveman Cooking blog at http://cavemancooking.net authored by Caveman. This recipe may be shared and reprinted as long as this entire copyright message accompanies it.

Posted in Appetizers, Christmas, Holidays, Latin, Main Course, Side Dishes | Tagged: , , , , , , , , , , , , , , , , , | 4 Comments »

Chili Rojo Rub

Posted by Caveman Cooking on December 4, 2015

Chili Rojo Rub
This is a simple Latin flavored, zesty, smokey rub that you’ll need for our Killer Chili Rojo Tamales. Also works great for a unique rendition of Carnitas, as well as many other South-of-the-border dishes.

INGREDIENTS

2 Tablespoons World Spice Merchants Yucatan Rojo
1 Tablespoon World Spice Merchants Chipotle Chili Powder
1/2 Teaspoon Cayenne Pepper
1/2 Teaspoon Chili Salt
1/2 Teaspoon Dried Minced Garlic

RECIPE

Mix all ingredients into a small bowl, and mix well. BOOM … you’ve got rub!

Prep Time = 5 minutes
Makes 3.5 Tablespoons of rub

©2015 Caution: Caveman Cooking/UHearMe, Inc. All rights reserved. This recipe originally appeared on the Caution: Caveman Cooking blog at http://cavemancooking.net authored by Caveman. This recipe may be shared and reprinted as long as this entire copyright message accompanies it.

Posted in Latin, Rubs, Sauces, Marinades & Dressings | Tagged: , , , , , , , , | Leave a Comment »