Caution: Caveman Cooking

Recipes so easy, even a … Well, you know!

Archive for the ‘Side Dishes’ Category

Cavey’s Killer Coleslaw

Posted by Caveman Cooking on September 10, 2020

I know what you’re saying. “Where the heck you been, Cave?”. I don’t blame you … been WAY too long. No excuses here. Other than to say that, pandemic and other macro events aside, life has been very “interesting” the past few years. Instead of droning on about the details, how about if I give you a really simple, yet delicious recipe instead? Sure, it would have been better to give you this at the start of summer. But, while this tangy-sweet slaw is the perfect compliment to BBQ, it also goes great with, or on, deli sandwiches, burgers, dogs, fish tacos, and more. And, I promise, more new recipes soon. We good?

INGREDIENTS

15 Ounces Shredded Cabbage (I prefer the angel hair type)
3/4 Cup Mayonaise
1/4 Cup Apple Cider Vinegar
1/4 Cup Sugar
1/4 Tsp. Celery Seed
Salt & Pepper to taste

RECIPE

Place mayo, vinegar, sugar, celery seed, salt, and pepper into a small mixing bowl.
NOTE: I don’t add any additional salt … the mayo already contains enough, for my taste.

Cavey's Killer Coleslaw 1

Whisk until mixed well. Should have the consistency of a light dressing.

Cavey's Killer Coleslaw 2

Place shredded cabbage into a large mixing bowl. Pour coleslaw dressing over cabbage.
NOTE: I just buy the pre-shredded angel hair cabbage in the package, at the store. You can also buy the tri-color coleslaw, or get a head of cabbage and shred your own.

Cavey's Killer Coleslaw 3

With two soup spoons, or salad tongs, toss well until all cabbage is completely covered.

Cavey's Killer Coleslaw 4

Place coleslaw into an air tight container and refrigerate for at least an hour. Overnight is even better.

Cavey's Killer Coleslaw 5

As mentioned above, serve with, or on, your favorite BBQ dish, deli sandwich, hamburger, hotdog, fish tacos, etc.

Cavey's Killer Coleslaw 6

Prep Time = 15 minutes
Refrigeration Time = 60 minutes, or more
Serves 6-8

©2020 Caution: Caveman Cooking/UHearMe, Inc. All rights reserved. This recipe originally appeared on the Caution: Caveman Cooking blog at http://cavemancooking.net authored by Caveman. This recipe may be shared and reprinted as long as this entire copyright message accompanies it.

Posted in Rubs, Sauces, Marinades & Dressings, Side Dishes, Vegetarian | Tagged: , , , , , , , , , , , | Leave a Comment »

Phenomenal Focaccia Stuffing

Posted by Caveman Cooking on November 17, 2016

Stuffed Thanksgiving Turkey
I’ve been promising to share my focaccia bread stuffing recipe for years. But, I’ve been dragging my feet like a typical Neanderthal. Guess what? The wait is over! This stuffing is so good, we make it several other times during the year. Of course, it’s perfect for Turkey Day. So, the timing couldn’t be better. If you’d like, add sausage, bacon, mushrooms, leeks, dried fruit, apples, grapes, or just about anything to snazz it up. Though, the Caveclan likes to just go with this basic combination. By the way, this recipe can be used inside the bird or out. If you want both, you’ll have to double it.

INGREDIENTS

1.5 – 2 Large Foccaia Bread Loafs (1 Pound when turned into croutons)
1 Medium Sweet Onion
3 Stalks of Celery
1 Cup Water Chestnuts
4 Cups Vegetable Broth
1/4 Cup Olive Oil
Salt & Pepper to taste

RECIPE

Slice focaccia loaf into small bite-sized pieces. Place onto cookie sheet and put into a preheated 350° oven for 10-15 minutes until cubes become croutons and are very lightly browned.
NOTE: You can make your own homemade bread. Though, the bakery at our local market makes an incredible “Italian Flatbread” that is absolutely perfect.
Slicing Focaccia Bread

Place broth into a medium sized pot and heat until warmed. Do not bring to a boil.
Warming Broth

Dice celery, water chestnuts, and onion.
Dicing Celery, Water Chestnuts, and Onion

In a large stock pot, heat olive oil. Add diced veggies and saute until onions become translucent. Turn off flame and add focaccia croutons. Gently stir until bread cubes are covered in olive oil. Then, 1/2 cup at a time, slowly add warm broth and stir together so that croutons become evenly coated. Once stuffing is sufficiently soaked (you don’t want mush, but your don’t want them too dry, either) you are ready to move on.
Sauteing Veggies. Mixing in Croutons. Stirring in broth.

If you are going to cook your stuffing inside the turkey, loosely spoon it into the body and neck cavities of the turkey just before you start roasting. Be sure to cover both the bird and stuffing with a foil tent until the last hour of cooking. Stuffing is done when the center of it reaches 165°. The outside will have a nice brown crust, while the inside will be moist and flavorful. Spoon out all the stuffing into a serving bowl, cover, and let stand for about 7-10 minutes.
Stuffing in Turkey

To make your stuffing outside of the bird, butter the inside of a large baking dish. Spoon in stuffing, and top with thin slices of butter. Cover the baking dish and place into a preheated 375° oven. After 25 minutes of baking, remove the cover and allow the top of the stuffing to brown for about 20 minutes. When done, remove from oven, cover, and let stand for about 7-10 minutes.
Stuffing in Baking Dish

Now, serve your stuffing along side all your other Thanksgiving goodies, and enjoy!
Thanksgiving Plate

Prep Time = 30 minutes
Cooking Time = 45-50 minutes outside of bird. When turkey is done and stuffing reaches 165° inside of bird.
Serves 8-12

©2016 Caution: Caveman Cooking/UHearMe, Inc. All rights reserved. This recipe originally appeared on the Caution: Caveman Cooking blog at http://cavemancooking.net authored by Caveman. This recipe may be shared and reprinted as long as this entire copyright message accompanies it.

Posted in Christmas, Holidays, Side Dishes, Thanksgiving, Vegetarian | Tagged: , , , , , , , , , , | Leave a Comment »

Killer Chili Rojo (Red Pork) Tamales

Posted by Caveman Cooking on December 4, 2015

Killer Chili Rojo (Red Pork) Tamales
I gave you my Killer Queso (Cheese) Tamale recipe a few months back. Though, I probably should have posted it’s carnivore counterpart sooner, I felt, with Christmas right around the corner, now would be a perfect time to share it. While this remains a labor intensive recipe, it really is a very easy dish to pull off. Besides, if you gather your masses together for an assembly line when it comes time to actually fill and roll the tamales, it goes by very quickly. When you finally unwrap one and take a bite, you’ll forget about all the steps involved!

INGREDIENTS

Chili Rojo (Meat Filling):
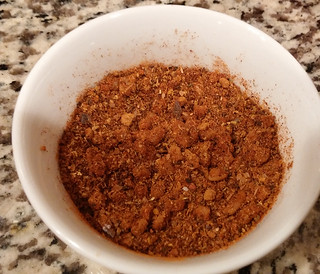
1 Preparation of Chili Rojo Rub
2.5 Pounds Pork Butt (Shoulder) Roast
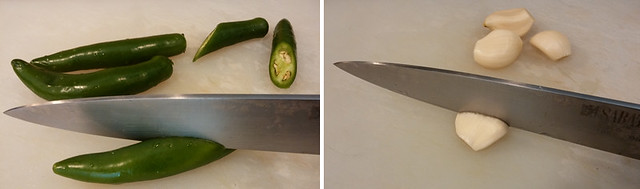
1/2 Red Onion
5 Cloves Garlic – Smashed
1 Teaspoon Kosher or Sea Salt
1 1/2 Cups Red Chili Sauce
1 1/2 Cup Chili Rojo Stock – Reserved

Masa (Dough):
5 Cups Tamal (Instant Masa Mix)
4 1/2 Cups Vegetable Stock
1/2 Cup Chili Rojo Stock – Reserved
2 1/2 Teaspoons Baking Powder
1.5 Teaspoon Salt
2 1/8 Cups Vegetable Shortening
1 1/4 Teaspoon Cayenne Pepper

1 Package Hoja (Dried Corn Husks)

RECIPE

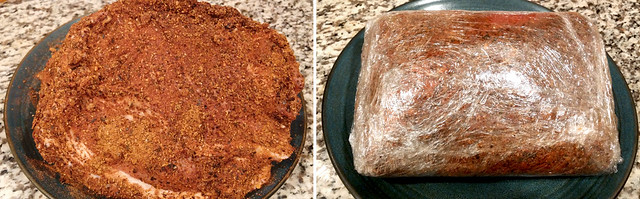
Follow the instructions for one preparation of Chili Rojo Rub.
Chili Rojo Rub

Cover pork butt roast liberally with the rub. Cover tightly with plastic wrap, place on a plate, and refrigerate overnight.
Pork Butt Roast Covered With Chili Rojo Rub

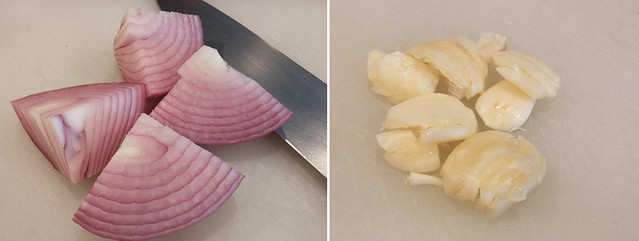
The next day, remove the roast from the refrigerator 15-20 minutes before you are ready to start cooking. Slice onion into quarters. Peel and smash garlic cloves.
Quartered Onion & Smashed Garlic

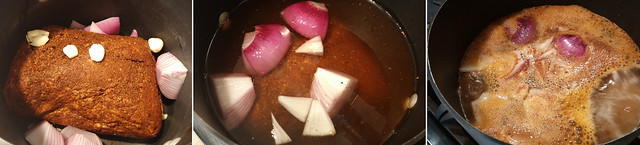
Place pork roast into a stock pot. Cover with water by 2-3 inches. Add onion, garlic, and salt. Bring to a boil. Then, reduce heat, cover, and simmer for 2.5 – 3 hours, until fall-apart tender.
Pork Roast In Stock Pot

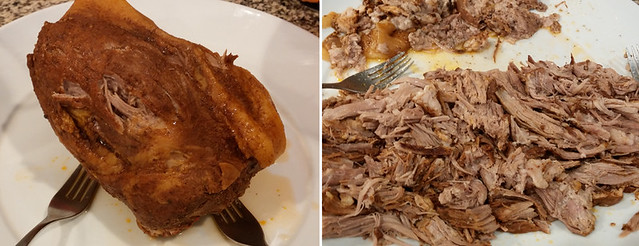
When done, remove the pork roast from the stock pot and place onto a large platter. Let it rest for 10-15 minutes, then shred meat with two forks or, if you have them, meat claws. Be sure to separate the meat from the fat, and discard the latter.
Shredded Chili Rojo

Reserve 2 cups of the meat stock (1 1/2 for the meat, 1/2 for the masa) and set aside.
Reserving Meat Stock

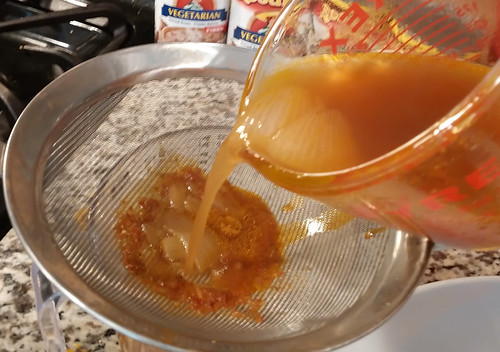
Place the shredded meat into a large sauce pot, add Red Chili Sauce and reserved meat stock, and heat uncovered over a low flame for 20 minutes. Stir often.
NOTE: You’ll likely have some left over meat filling. Don’t sweat it, it makes for a great version of Carnitas!
Saucing & Reheating Meat Filling

Cover the Hoja (corn husks) with cool water for at least 40 minutes. When thoroughly soaked, squeeze excess water out then place into a colander to allow rest of excess water to drip out. Do not let the husks dry completely – they must be moist and pliable when wrapping the tamales.
HINT: Place a heavy plate on top of the husks so that they stay completely submerged.
Soaking The Hoja (Corn Husks)

While the meat filling is simmering and the Hojas soaking, make your Masa (dough). Place shortening into mixer and whip it until silky (3-4 minutes). Yes, Devo fans. I said, whip it. Whip it good!
Whipped Shortening

Meanwhile, place all the dry ingredients (Tamal, baking powder, salt, cayenne pepper) into a large mixing bowl and whisk together.
Dry Ingredients

Add vegetable stock and meat stock to dry ingredients. Using your hands, mix well until evenly distributed.
Dry Ingredients With Vegetable Stock

Add ingredients from mixing bowl to whipped shortening. Again, whip it until smooth and creamy (3-4 minutes). And yes, again, whip it good!
Whipped Masa (Dough)

Now’s the time to gather the clan and press them into service. Pop open a cold one, put on some good tunes, and make a party of it!
Place one of the large Hoja (husks) on a flat surface and spoon about 2 tablespoons of the masa (dough) onto it. Now, this is where some tamale veterans may cringe, but I have found that this next step makes things go much faster and smoother. Take a small piece of plastic wrap and place it over the masa. With your hand, smooth and spread the masa out evenly, leaving several inches from the bottom of the husk, a couple inches from the top and far edge, and less than an inch from the near edge. The masa layer should be about 1/4″ thick. Remove the plastic wrap and set aside to use again. Then, scoop about 2 tablespoons of the Chili Rojo (meat filling) into the center of the masa.
HINT: If your Hoja are on the smaller side, just overlap two of them by a few inches to make one big leaf. Use a rubber spatula to spread a little masa on the near edge of the bottom husk to act as “glue”.
Making Tamales: Steps 1, 2, and 3

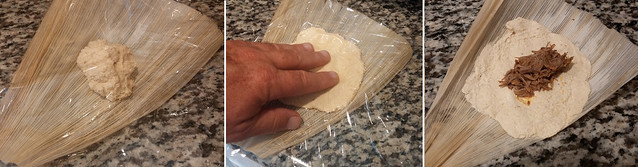
This is where a history of being a Hippie or Rastafarian, comes in handy. Take the near side of the Hoja and fold it over the the far edge. With your fingertips, lightly press the edges of the masa down to seal in the meat. Then, while holding down the far edge of the husk, push down and draw back the near edge of the husk an inch or two so that the masa forms a sealed tube, of sorts. Now, fold up the bottom (narrow) end of the Hoja, making sure it is snug up to the bottom of the filling. Finally, roll the entire thing away from you, over the remaining flap, and …
Making Tamales: Steps 4, 5, and 6

… KaBOOOOOOOM! You have a tamale!! Most folks say tying up the open end of your tamale is optional. But, tying them up with a strip of Hoja keeps all the ingredients inside, and also helps make them look better when done.
Finished Tamales

Once you have formed all of your tamales, fill the bottom of a large steamer pot with water, place the steam insert into the bottom, and cover it with several Hoja leaves. Stack the finished tamales standing up in the steamer. Bring the water to a boil and cover the steamer, allowing the tamales to steam for about 60 minutes.
HINT: You’ll notice that the one tamale I didn’t tie up leaked out the top. Which is why I strongly urge you to give them the “50 Shades Of Grey” treatment.
Steamer, Raw Tamales, and Steamed Tamales

When you think they are done, remove one to test. When it has cooled sufficiently, unwrap it and enjoy. If it has steamed sufficiently, remove the rest from the steamer. Serve with avocado, guacamole, pico de gallo, salsa, rice and beans … you name it! These also freeze very well for future use. Just re-steam them or nuke ’em in the microwave, once they have defrosted.
Killer Queso (Cheese) Tamales

Give these a try … you won’t be disappointed. I’ve had several Hispanic friends swear me to secrecy that they actually liked these better than their Mom’s. Don’t worry, amigos … I’m not naming names! 😉

Marinate Time = 24 Hours
Prep Time = 90 minutes
Cooking Time = 4 Hours
Makes 28-32 Tamales

©2015 Caution: Caveman Cooking/UHearMe, Inc. All rights reserved. This recipe originally appeared on the Caution: Caveman Cooking blog at http://cavemancooking.net authored by Caveman. This recipe may be shared and reprinted as long as this entire copyright message accompanies it.

Posted in Appetizers, Christmas, Holidays, Latin, Main Course, Side Dishes | Tagged: , , , , , , , , , , , , , , , , , | 4 Comments »

Cavey’s Spicy Dill Pickles

Posted by Caveman Cooking on May 7, 2014

Cavey's Spicy Dill Pickles
Everybody in the Cavehold loves a good pickle. Problem is, most store bought jarred pickles aren’t that good, and making trips to the local deli several times a week can get a bit cost prohibitive. So, we went to work and came up with this easy recipe that many are describing as the best pickle they’ve ever eaten. Give ’em a try, and let us know your thoughts.

INGREDIENTS

4 Large Cucumbers
4 Serrano or Jalapeño Peppers
4 Garlic Cloves
1 Ounce Fresh Dill
4 Cups White Vinegar*
4 Cups Water
2 Tbsp. Pickling Spice
1/4 Cup Pickling or Kosher Salt
4 24-Ounce Canning Jars

Optional:
1/4 White or Sweet Onion – Sliced
1/2 Red Bell Pepper – Sliced
1 Large Carrot – Sliced

*UPDATE: Recently, we have altered the recipe slightly by substituting 1.5 cups of Apple Cider Vinegar in place of 1.5 of the cups of White Vinegar. It has taken these amazing pickles to another level. Give it a go!

RECIPE

First, sterilize your canning jars and lids. A run through the dishwasher, with the “Hot Water Heat” and “Hot Air Drying” settings turned on, will do the trick.
HINT: You can use traditional canning jars and lids. Or, as we do in the Cavehold, save the jars and lids from store bought pickles, olives, relish, etc.
Place vinegar, water, salt, and pickling spice into a medium-large pot and bring to a soft boil for 10-15 minutes.
Boiling water, vinegar, and spices

While liquid is heating, rinse cucumbers well in cold water and slice each cucumber in half, crosswise. Then, again in half, lengthwise. From each remaining section, slice into three equal sized spears, lengthwise. You should get 12 spears per cucumber.
Slicing cucumbers

Slice hot peppers and garlic cloves in half. Cut any of the optional vegetables into 2 inch slices.
NOTE: While the “optional” ingredients aren’t required, the more you put in the more the flavor complexity of the pickles increases.
HINT: If you don’t want your pickles to have an edge, don’t add the Serrano or Jalapeño peppers. Though, you really should try them in at least one jar … they don’t add that much heat, but do add a ton of flavor.
Slicing peppers and garlic

Now, place 1/4 of the fresh dill into each jar. Follow that with 12 cucumber spears, 2 slices of the hot peppers, 2 slices of the garlic, and a 1/4 of the optional ingredients into each jar.
Stuffing the jars

Once the brining liquid has fully cooked, place a jar into the sink. Using an oven mitt, remove the boiling liquid from the flame, and completely fill the jar with the liquid, being sure that 1/4 of the pickling spices also make it in.
Pouring brine into jar

Return the pot to the flame and, with oven mitts on, carefully place the lid on the jar and tighten firmly as possible. Repeat this process with each jar, being sure to return the pot to the fire (mmmmmmmmm …. fire gooooood!) between each pour. Place finished jars onto the counter and allow to cool for 15-20 minutes.
Finished jars of pickles

Once cooled to the touch, place the jars into the refrigerator and forget about them for two weeks. It will be tempting to pop open a jar and give ’em a go once they’ve chilled. But, they need the time to “pickle”, of course! They’ll last up to 4 months in the fridge. DO NOT store them in the pantry …. you gotta keep ’em cold. Enjoy!
HINT: The other veggies (except for the dill) are now pickled, and delicious, as well. Yes, even the garlic!
Cavey's Spicy Dill Pickles

Prep Time = 40 minutes
Curing Time = 2 Weeks
Makes 4 Jars

©2014 Caution: Caveman Cooking/UHearMe, Inc. All rights reserved. This recipe originally appeared on the Caution: Caveman Cooking blog at http://cavemancooking.net authored by Caveman. This recipe may be shared and reprinted as long as this entire copyright message accompanies it.

Posted in Side Dishes, Vegetables, Vegetarian | Tagged: , , , , , , , , , , , , , , , , , , , , | Leave a Comment »

C3TV: Garlic Mashed Taters

Posted by Caveman Cooking on December 27, 2013


On this episode, we’ve got a simple but scrumptious side dish that goes equally well with an everyday meal as it does with a Holiday feast. Our famous Garlic Mashed Taters! A simple, yet yummy mashed potato recipe that’s sure to get your taste buds dancing and your guests singing your culinary praises.

Episode 202

©2013 Caution: Caveman Cooking/UHearMe, Inc. All rights reserved. This originally appeared on the Caution: Caveman Cooking blog at https://cavemancooking.wordpress.com authored by Caveman. This may be shared and reprinted as long as this entire copyright message accompanies it.

Posted in C3TV, Side Dishes, Thanksgiving | Tagged: , , , , , , , , , , , , , , , , , , , , , | Leave a Comment »

A Neanderthal Thanksgiving

Posted by Caveman Cooking on November 27, 2013

T-Day Turkey BrineWell, the big day isn’t until tomorrow, but the cooking almost certainly starts in earnest today. So, if you are looking for a few last minute Turkey Day ideas, I thought I’d share the annual standards we employ in the Cavehold.

I just posted my famous Cavey Gravy recipe the other day. But, you’ll need to put that gravy on something (though, some have considered just grabbing the gravy boat and a straw! 😉 ). Of course, the main event (ie. turkey) is a prime candidate to be smothered in that savory sauce, which calls for a start 24 hours before you pop it into the oven. That’s because we always use our T-day Turkey Brine to ensure a moist, flavorful bird. White wine, grapes, garlic, and rosemary are the mainstays of this magnificent marinade.

Garlic Mashed TatersOne thing that most Thanksgiving gobblers agree on: mashed potatoes are a must! Plus, they are another traditional landing pad for the gravy. But, if you are going to cook like a Caveman, you are going to have to bump it up a notch or two. We accomplish that with our tasty Garlic Mashed Taters. Milk, sour cream, and cream cheese are all combined into this recipe to create a creamy, delectable side dish … which does make it the “Angioplasty Special”. Though, if you are only cranking these spuds out once or twice a year, your cardiologist shouldn’t mind too much. I can attest that your taste buds won’t complain one bit!

Every meal calls for a vegetable. But, even the most anti-veggie attendee can’t turn their nose up on the Cavewoman’s incredible Super Spinach Soufflé. With eggs, two kinds of cheeses, milk, and butter it is plainlySuper Spinach Soufflé obvious that this is not a healthy dish, either. So, we try to cut out some of the fat by using non-fat milk and light sour cream. It works great, and there is plenty of other fat in there to more than make up the difference! I guarantee if you try this one at your T-Day feast once, it will become a regular participant in your family’s faire for years to come.
HINT: I highly recommend that you get some Cougar Gold from the WSU Creamery for this recipe. It adds the perfect flavor that just pushes the entire dish over the top.

Holiday cooking has always been where my Mom shines brightest in the kitchen. Her creative mind is always at work … but, none more so than when she puts her signature touch on a recipe. This is plainly evident with her Cavemom’s Orange Yam TurkeysCavemom’s Orange Yam Turkeys – an ingenious spin on the traditional Thanksgiving yams. This unique, colorful, and tasty dish has become a real favorite of the Cavekids … not just to eat, but to make as well. They really look forward to working in the kitchen on these with their Cavenana, and this year is no different! They’ve already been asking us if their grandmother was “bringing all the stuff to make Yam Turkeys”. Put one of these on your guest’s plate, and I guarantee they will be ooing and cooing about how cute they are. That is, until they taste it and start oohing and awing about how delicious they are! Yams, orange, pineapple, nuts, marshmallows, butter … I mean, what could be bad about that, right?!?!

Cave’s Cranberry SauceYou can’t call it a Thanksgiving meal without cranberry sauce. However, far too many call it “good” with a canned variety of the tangy berry relish. If you are in that crowd, I strongly advise you step out of your canned comfort zone and give my Cave’s Cranberry Sauce a go. It will only take an extra 20 minutes in your meal’s preparation, and you will end up with a C-sauce that will forever have you shunning the pre-made type in the future. Plus, it’s easy … just the recipe on the package with some molasses and either wine, port, cognac or brandy added. Best of all, you can make it a day or two ahead of time and refrigerate it until chow time – which actually also helps it to set up better, both flavor and consistency wise. The only problem with that is keeping everyone away from it until the big meal … the Cavewoman is our biggest offender on that!

Most of all, we wish you the sweetest of Thanksgiving Holidays, filled with laughter, love, and memories to last a lifetime!

©2013 Caution: Caveman Cooking/UHearMe, Inc. All rights reserved. These recipes originally appeared on the Caution: Caveman Cooking blog at http://cavemancooking.net authored by Caveman. These recipes may be shared and reprinted as long as this entire copyright message accompanies them.

Posted in Holidays, Main Course, Rubs, Sauces, Marinades & Dressings, Side Dishes, Thanksgiving, Vegetables, Vegetarian | Tagged: , , , , , , , , , , , , , , , , , , , , , , , | Leave a Comment »

Super Spinach Soufflé

Posted by Caveman Cooking on December 22, 2011

Super Spinach Soufflé
While you wait for the next episode of C3TV (which is coming next week) we thought we would tempt your taste buds with this delicious dish that works great with any meal, but is especially suited for your Holiday fare. This is also a recipe that we have gotten many requests for since this site came to be. So, before we need to make any more excuses why it hasn’t appeared here yet, please read on … 😉

INGREDIENTS

2 10 Ounce Packages Frozen Chopped Spinach – Defrosted and Drained
2 Cups Cougar Gold Cheese (or another aged white cheddar cheese) – Shredded
2 Cups Medium Cheddar Cheese – Shredded
2 Cups Milk
1 Cup Sour Cream
4 Large Eggs – Beaten Well
6 Tablespoons Butter
1 Tablespoon Garlic – Chopped
1/2 Teaspoon Garlic Salt
1/4 Cup Flour
Salt & Pepper to taste

RECIPE

Defrost and drain spinach.
NOTE #1: You might be tempted to use fresh spinach in this recipe, but we have found that the frozen variety works MUCH better.
Frozen Chopped Spinach

Shred both the Cougar Gold (which you might just have to crumble instead) and the cheddar cheese.
NOTE #2: While you can use another type of aged white cheddar cheese, we highly recommend using Cougar Gold for this dish. It’s unique flavor adds the right amount of zing to the taste of this soufflé. Plus, you can use whatever you have leftover for Stuffed Pork Loin, fondue, cheese puffs, or just served with crackers and grapes … Mmmmm MMMMMMM!
Also, you might want to shred some extra cheese if your brood is anything like the ingredient-stealing, cheese-munching Caveclan.
Shredded Cheese

Place spinach, shredded cheeses, and sour cream into a large mixing bowl and set aside.
Spinach, Shredded Cheeses, Sour Cream

In a medium sized sauce pan over a medium-low flame, melt the butter then whisk in the flour. Yes, this is a “roux”.
Making Roux

Now, slowly whisk in the milk. When the sauce becomes evenly smooth and creamy, whisk in the garlic.
The Sauce

Add the sauce to the large mixing bowl with the other ingredients and mix everything together well.
Mixing Ingredients Together

Stir the eggs into the mixture (It is at this point that we would suggest you stop your “taste-testing” of the raw but delicious mixture). Salt and pepper to taste.
HINT: It’s best to have your own beautiful and talented Cavewoman to put this dish together. Besides, it’s her recipe, so I had to give her some props! 😉
The Cavewoman

Place the entire mixture into a large, well buttered, baking dish. Place it, uncovered, into an oven preheated to 400° for about 45 minutes … until the top is slightly caramelized and the soufflé hardly moves when the baking dish is jiggled. As actual oven temperatures my vary, so will cooking times … just make sure it is cooked all the way through!
Mixture In Baking Dish

When done, let the soufflé set up for 10 minutes before serving. Eat your heart out, Popeye!
Super Spinach Soufflé

NOTE #2: It is plainly obvious that this is not a healthy dish. So, we try to cut out some of the fat by using non-fat milk and light sour cream. It works great, and there is plenty of other fat in there to more than make up the difference!

Prep Time = 30 minutes
Cook Time = 45 minutes
Serves 8-12

©2010 Caution: Caveman Cooking/UHearMe, Inc. All rights reserved. This recipe originally appeared on the Caution: Caveman Cooking blog at http://cavemancooking.net authored by Caveman. This recipe may be shared and reprinted as long as this entire copyright message accompanies it.

Posted in Christmas, Hanukkah, Holidays, Side Dishes, Thanksgiving, Vegetables, Vegetarian | Tagged: , , , , , , , , , | 6 Comments »

R&R Pulled Pork Tacos & Gnarly Nachos

Posted by Caveman Cooking on March 21, 2011

R&R Pulled Pork Tacos Yeah, I know … I’ve been lagging BIG TIME around here. Rather than bore you with all mundane, yet legitimate, excuses as to why, I think I’d rather share this delicious combo of American BBQ and south of the border flavors! Besides, wouldn’t you rather have a delectable new dish to try instead of being up to date on the daily trials and tribulations of an ordinary Neanderthal??? I thought so! 😉 These tacos are kind of a domesticated version of the famous Al Pastor taco found in most authentic Mexican taquerias. First thing you’ll need to do is follow the instructions for preparing one recipe of Dutch Oven R&R Pulled Pork. Be sure to start that recipe a day ahead, as you will have to marinate the pork shoulder overnight with some smokey dry rub – we prefer our homemade BBQ Rub-a-dub which was developed specifically for this recipe. Once it is in the oven cooking, you’ll want to get on making the R&R BBQ Sauce, which takes a couple hours of simmering on the stove top. By the way, don’t be afraid to try this sweet and spicy sauce on ribs, beef, chicken, or anything else you might barbeque. You’ll definitely want to top those tacos with some salsa (We’ll have to write up our simple and rapid salsa recipe for you soon … it will make you forego bottled salsas for good!) and some guacamole. Since the Pulled Pork and BBQ sauce cook for so long, you’ll have plenty of time to whip up some Rockin’ Guac. Be sure to make extra, because not only are you likely to be nibbling on some before the meal, but you’ll also need some to go with the Nachos! Speaking of which, the recipe for our Gnarly Nachos is so simple, we are actually going to abandon the usual step-by-step photo instructions and just spell it out for you here. Take a medium sized baking dish or pan and lightly coat with non-stick spray. cover the bottom with a single layer of your favorite tortilla chips. Top the chips with scattered spoonfuls of refried beans (we use the vegetarian variety for the herbivores in our Cave clan), then cover with shredded cheddar cheese. Add another layer of chips, and repeat the process with the beans and cheese. Place in an oven preheated to 350° for 10-15 minutes, until cheese is completely melted and the beans are hot. When done, remove from oven and top with pickled Jalapeno slices, salsa, and guac. If you like, you can also add chopped tomatoes and onions, sour cream, cilantro … you name it! When the pulled pork recipe is complete, heat up some corn tortillas, top them with a healthy scoop of the tender meat and top with guac and salsa. I guarantee that the mewls of palatable pleasure you will hear around the dining table will be the perfect musical compliment to these devine dishes! ©2011 Caution: Caveman Cooking/UHearMe, Inc. All rights reserved. This originally appeared on the Caution: Caveman Cooking blog at http://cavemancooking.net authored by Caveman. This may be shared and reprinted as long as this entire copyright message accompanies it.

Posted in BBQ, Latin, Main Course, Side Dishes, Vegetarian | Tagged: , , , , , , , , , | 12 Comments »

Garlic Mashed Taters

Posted by Caveman Cooking on November 25, 2010

C3TV - Watch This RecipeGarlic Mashed Taters
One thing that most Thanksgiving gobblers agree on: mashed potatoes are a must! So, I thought I’d share our simple, yet yummy mashed potato recipe. Sure, it’s last minute. But, this is one dish that can be quickly whipped together.

INGREDIENTS

6 Medium Potatoes (Russet, Red, or Yukon Gold)
6 Large Cloves Garlic
1/4 Cup Milk
1/4 Cup Sour Cream
2 Tablespoons Cream Cheese, softened well
1 Tablespoons Butter, softened well
3 Tablespoons Green Onion Chives
1 Teaspoon Pink, Kosher or Sea Salt
1 Teaspoon Olive Oil
Salt & Pepper to taste

RECIPE

Thinly slice garlic lengthwise. Set aside.
Sliced Garlic

Finely Chop green onion chives. Set aside.
Chopped Green Onion Chives

Scrub potatoes well. Chop into even, generous chunks.
HINT: This dish tastes great whether you utilize Russet Brown, Red Rose, or Yukon Gold taters. No matter which you use, LEAVE THE SKIN ON! They are both healthier and tastier that way. Though, if you do go with the brownies, I suggest peeling 2 or 3 of the potatoes due to the heavier skin these spuds tend to have.
Scrubed and Chopped Potatoes

Fill a large pot halfway with water. Add half the sliced garlic and the teaspoon of salt. Bring the water to a boil.
Pot Of Water With Salt & Garlic

Take the other half of the sliced garlic and place into tin foil. Drizzle with the olive oil and create a foil tent. Roast garlic in 350° toaster or conventional oven for 15-20 minutes, until tender.
Roasted Garlic

While water is heating up (before it gets to a boil so as to reduce the chance of scalding yourself), and all the salt has dissolved, carefully add the potatoes. Allow to reach a boil and continue to cook until potato chunks are easily penetrated by a fork.
Adding Potatoes To Water

When fully cooked, strain potatoes well in colander, being sure to reserve the boiled garlic slices, as well. Immediately place strained taters into large bowl. Add butter, milk, sour cream, cream cheese, chives, and roasted “gah-lick” to bowl. Salt and pepper to taste.
All Ingredients In Bowl

Use a potato masher for it’s intended employ until the desired consistency of the taters are reached … some like ’em chunky while others like ’em creamy. You can also add more sour cream and/or milk at this point, if needed.
Mashing Potatoes

Serve as a side to a multitude of different dishes. Of course, they are perfect for Thanksgiving dinner. Though, they are served here with Korean Pork Chops (Daeji Galbi) and Sauteed Asian Veggies.
Garlic Mashed Taters

The entire Caveclan wishes you a safe and savory Thanksgiving!

Prep Time = 20 minutes
Cook Time = 20 minutes
Serves 6

©2010 Caution: Caveman Cooking/UHearMe, Inc. All rights reserved. This recipe originally appeared on the Caution: Caveman Cooking blog at http://cavemancooking.net authored by Caveman. This recipe may be shared and reprinted as long as this entire copyright message accompanies it.

Posted in Side Dishes, Thanksgiving, Vegetarian | Tagged: , , , , , , | 9 Comments »

Cavemom’s Orange Yam Turkeys

Posted by Caveman Cooking on November 24, 2010

Cavemom's Orange Yam Turkeys
This is very exciting! Not only is this a great recipe for a unique spin on a Thanksgiving favorite, it’s also the first recipe shared here on C3 from the Cavemom!! She has been making this delicious version of Yams at our Holiday dinner for years. Now, you can, too!

INGREDIENTS

* 8 Small or Medium Yams
* 4 Thick Skinned Oranges
* 4 Tablespoons Butter, softened well
* 1 20 oz. Can Crushed Pineapple, drained (reserve 1/4 cup)
* 1 Cup Chopped Walnuts or Pecans
* 1 Cup Mini Marshmallows
* 2 Tablespoons Brown Sugar
* 1/4 Cup Orange Juice, reserved from oranges
* 1/4 Cup Pineapple Juice, reserved from pineapples
* Salt & Pepper to taste
* Tin Foil

RECIPE

Place yams and 1/2 a tablespoon of kosher salt into large pot of boiling water.
Yams in boiling water

While yams cook, slice oranges in half. Then, with a paring knife and a spoon, carefully scoop out orange flesh being sure not to cut or tear orange skins.
Scooped Oranges

Reserve 1/3 cup of the fresh orange juice. Eat the orange flesh at your leisure (they also make for a great fruit salad).
Reserved Orange Flesh & Juice

Once the yams are fully cooked, drain from water, allow to cool slightly, and remove skin. Place skinned yams into a large bowl or container along with butter, orange juice, pineapple juice, brown sugar, and salt & pepper to taste. Mash and mix well with a potato masher. Add pineapple and nuts, fold in well.
Mashed Yams

One of the great things about this recipe is that it can be prepared ahead of time and then finished a half hour before serving. If you don’t prepare them right away, bag up the orange skins, place the yams in an airtight container, and refrigerate both until ready for use. Also, DON’T add the nuts until just before you are ready to finish preparing them – you don’t want them to get soggy.
Orange Skins

This is the other great part of this recipe (other than the taste), especially if you team up with your grandkids to create a fun tradition. When you are ready to prepare them, evenly distribute the yam mixture into each of the eight orange skins. Then use some tin foil to make the Turkey’s feathers, and the marshmallows to make the bird’s face (we usually make them smile ;)). Place the yam turkeys on a large cookie sheet and place into an oven preheated to 350°. Cook until hot and marshmallows have browned slightly. Serve with the rest of your Thanksgiving fare.
Cavemom's Orange Yam Turkeys

A wish to you for a healthy, happy, and delicious Thanksgiving from the “Cavemom”.

Prep Time = 30 minutes
Cook Time = 20 minutes
Serves 8

©2010 Caution: Caveman Cooking/UHearMe, Inc. All rights reserved. This recipe originally appeared on the Caution: Caveman Cooking blog at http://cavemancooking.net authored by Caveman. This recipe may be shared and reprinted as long as this entire copyright message accompanies it.

Posted in Side Dishes, Thanksgiving, Vegetarian | Tagged: , , , , , , | 7 Comments »